THE WORLD BY KEJMY.

  • HOME
  • MENU
  • _BEAUTY
  • _DIY
  • _FASHION
  • _OTHER
  • _TRAVELING
  • ABOUT
  • CONTACT

      Opäť sa k vám prihováram a prichádzam s malou #diy inšpiráciou na malé-milé svietničky, ktoré zútulnia nejeden vianočný priestor, či vyčaria iskričku radosti v očiach ako pekný vianočný darček, ktorý môžete niekomu z lásky darovať. 

     Pri kreácií sa, samozrejme, medze nekladú a preto je na vás, akú sviečočku, či obal na ňu, použijete. Ja som pri výrobe už mala sviečočky v sklíčku, ktoré si tiež viete veľmi jednoducho vyrobiť sami. Potom už je na rade len lepidlo, umelý sneh alebo biele trblietky, stužka na ozdobu a vo-á-lá, krásna vianočná dekorácia je na svete!

     Tak čo, skúsite tento malý #diy projektík aj vy? A nezabudnite si pri práci pustiť ďalšiu vianočnú pieseň z môjho vianočného playlistu a užívajte si tieto krásne decembrové chvíle naplno!


ENGLISH : I'm here again with some nice words about another little #diy inspiration, and today I bring you these little handmade candlestick you can make yourself too. They might cozy up any Christmas home, or they can make a little spark of happiness in the eyes of someone you'll give them to as a Christmas present made out of love.

     There are no limits during the creation process, so it's just up to you what kind of little candles you'll use for this project. I've chose the ones in the jars which you can also make yourself if you're that handy. Then it's just a glue, fake show or sparkles, some ribbons for decorating and there you have some wonderful decoration for this Christmas!

    So are you going to try this little #diy project? And don't forget to turn on another Christmas song from my Christmas playlist and enjoy these beautiful moments of December to the fullest!


PHOTOS : Kejmy Tatranská / @lady_kejmy

  • 1 Comments

     Sobota ako každá iná a pritom tam výnimočná... Dnes je prvý decembrový deň. Vonku je krásne bielo, mráz štípe líčka... To pravé počasie, aké by malo v decembri byť a trvať celý mesiac! A keďže sa dnes začalo odpočítavanie do Vianoc, najlepšie je ho začať prvým "okienkom" v adventnom kalendári... Ja tohto roku ten klasický nemám. Rozhodla som sa vytvoriť si niečo jedinečné a podľa vlastných predstáv! A ako to dopadlo? Len čítajte ďalej!

     Vzala som si nádherný vianočný baliaci papier, vystrihla z neho malinké obdĺžničky a vytvorila malé papierové vrecúška, do ktorých som vložila malé čokoládky. Kadý jeden z nich som uzatvorila a pripla srdiečkovým štipčekom s číslami (kúpila som ich vo Flying Tiger, ale môžete si ich vytvoriť aj sami za pomoci lepidla a papiera) na listnatú girlandu pripomínajúci imelo. To som nastrihala na rovnako dlhé štyri kúsky a nalepila ich na stenu pomocou papierovej pásky. A čudujte sa svete, mala som hotovo! 

    Naozaj veľmi jednoduché a rýchle! Nemáte sa čoho báť, stačí dobrý nápad a chuť tvoriť! Verím, že si jeden taký vytvoríte aj vy, pustite si pri jeho kreácií ďalšiu super vianočnú pieseň a užite si krásny prvý adventný víkend!


ENGLISH : Saturday as ordinary as the other, but at the same time so special... Today is the first day of December. There is snow outside, the frost makes the chicks red... This is the right weather which should last for whole December! And since the countdown of Christmas has begun today, the best way to start it is with the first "window" on the advent calendar... I don't have the classic one this year. I decided to create something different and the way I dreamed of it should look like! And how it all ends? Just read the rest of the article!

     I took the beautiful Christmas wrapping paper, I cut s little rectangles from it and I've made a small paper bags from them into which I've put small pieces of chocolates. I closed every single of one of them and I hung them with the tweak with hearts and numbers on them (I've bought them in Flying Tiger, but you make something similar by your own with a piece of paper and a little bit of glue) on the thin garland with leaves which looks like a mistletoe. I cut the garland into the same four pieces and I put them on the wall with the paper tape. And well, I was all done!

     It is really easy and quick to create! You don't need to be afraid to make it, you just need a good idea and the taste to create! I believe that you will make your own advent calendar, just turn on another Christmas song during the work and enjoy the first and beautiful weekend of Advent!


PHOTOS : Kejmy Tatranská / @lady_kejmy

  • 6 Comments

     Víkend som strávila vianočnými nákupmi, upratovaním a pripravovaním vianočných #diy projektov. Na mojom instagrame som sa vás pýtala, ktoré z nich by ste chceli vidieť ako prvé, a keďže ste vybrali práve tieto čokoládové sklíčka, tak poďme teda na to! Pýtate sa, na čo vlastne slúžia? Sú to sklíčka plnené ingredienciami vhodnými na tvorbu horúcej čokolády! Sú zabalené tak, aby ste ich mohli podarovať hocikomu, kto horúcu čokoládu má rád, alebo len chcete niekoho potešiť netradičným darčekom vyrobeným z lásky! Čo na ne budete potrebovať? Nejaké sklenené nádobky, kakao, čokoládu a všetko, čo v horúcej čokoláde máte radi!

     Keďže som zástancom recyklácie a upcyklácie, moje mini sklíčka slúžili pôvodne ako nádobky bio jogurtov. Môžete použiť tie od detskej výživy alebo aj od uhoriek, ak chcete niekomu podarovať celú zásobu horúcej čokolády! Keď prejdeme na potraviny, ja som použila 100% belgické kakao, ktoré dostanete bežne v obchode. To neobsahuje žiaden cukor, takže je dobré nejaký pridať. Najlepšie práškový. Ak sa vyhýbate normálnemu cukru, ale obľubujete hnedý, môžete si spraviť práškový cukor práve z neho! Ja som vzala svoj univerzálny mixér a rozdrvila kryštáliky na prach, čím mi vznikol práškový hnedý cukor, ktorý má na fotkách zlatistú farbu.

     Vezmete si sklíčko a začnete vrstviť kakao s cukom. Aký pomer zvolíte a koľko vrstiev, je na vás. Ja som k tomu pridala ešte mandle, ktoré som nakoniec tiež posekala v mixéri a vytvorila nimi ďalší farebný prúžok. Všetko je na vás a vašich chutiach, môžete pridať oriešky, škoricu, poprípade kávu, fantázií sa medze nekladú! Ja osobne mám rada naozaj čokoládovú chuť čokolády, preto som pridala vrstvu kociek čokolády, ktoré som nalámala na malé kúsky. Opäť, druh čokolády je na vás - horká, mliečna, biela... U mňa nasledovala vrstva marshmallow, bez ktorých si vianočnú horúcu čokoládu už ani neviem predstaviť a vo-i-lá, mala som plné sklíčka!

     Už stačí len ozdobiť a je to! Ja som použila zvyšok drôtiku s lístočkami, ktorý uvidíte aj pri tvorbe diy adventného kalendára, ale to až nabudúce... Tiež stužka, ktorej mám doma viac než dosť a bolo hotovo! Naozaj nič ťažké, len si to vyžaduje chvíľu času a trošku trpezlivosti. Ani mne to nevyšlo hneď na prvý krát, všetky tri som musela pretvárať niekoľko krát, kým nevyzerali pekne, ale to je súčasť každej dobrej práce! Ku ktorej si určite pustite ďalšiu vianočnú pieseň a nezabudnite mi dať vedieť, ak ste sa do tohto #diy postupu pustili! Budem sa tešiť a užite si krásny zvyšok dňa!


ENGLISH : I spent my weekend with Christmas shopping, cleaning and preparing Christmas #diy projects. I've asked you in my instagram stories, which one would you like to see first, and you picked these chocolate jars, so let's do this! Are you asking yourself, what are those and how you can use them? Well, these are the jars full of ingredients for making a delicious hot chocolate! They are packed the way you can give them as the gifts to someone, anyone who likes hot chocolate or you just would like to make someone happy with some unconventional gift made with love! What you will need? Some transparent jars - the best would be the ones made of glass, cocoa, chocolate and everything you like in your hot chocolate!

     As I am a supporter of recycling and upcycling, my mini jars had been used like the vials for bio yogurts. You can use, for example, the ones for the child food or the ones for the pickled cucumbers if you would like to give someone the whole stock of hot chocolate! When we head ourselves to foodstuff, I used the Belgium 100% cocoa, which you can buy in almost all ordinary stores. It doesn't contain sugar, so it is good to add some. The powdered sugar would be the best. If you don't like to use the white sugar, but you are willing to use brown, you can make the powdered sugar from it by yourself! I took my universal blender and I smashed the crystals to powder - that's how I've made the brown powdered sugar, which has the golden shade in the pictures.

     Take the jar, and start to overlay the cocoa with sugar. It's just up to you what kind of ration or how many layers you use. I've added the almonds into it, which I crushed with my blender and I've made another colorful stripe whit it. It's all up to your taste, you can add some nuts, cinnamon, or maybe a little bit of coffee if you want, your fantasy has no boundaries! I personally really like the real taste of chocolate in it, that's why I've also added the layer of milk chocolate, which I cut to the smaller pieces. Again, it is just up to you what kind of chocolate you would like to add - dark, milk, white... After that, I've added the layer of marshmallow, which can't be missed because I can't image the hot chocolate without them and vo-i-lá, I've had full jars!

     Now you just need to decorate them somehow and you're done! I used the rest of the staple with leaves, which you will see in the creation of another tutorial - the advent calendar, but you will see this some other time... I also used the ribbon, I still have a lot of it at home and I was done! It is nothing too complicated, you just need to find some more time for it and a little bit of patience. It hasn't looked very cool at first, I needed to recreate all of them for quite some times till they looked pretty, but it is just the part of the good work! You just need to turn on another Christmas song and don't forget to let me know if you try this #diy tutorial! I will look forward to it and just enjoy nice rest of the day!


PHOTOS : Kejmy Tatranská / @lady_kejmy

  • 7 Comments

     Trošku vás tu zanedbávam... A veľmi ma to mrzí! Ani si neviete prestaviť ako... Momentálne mám však nesmierne rušné obdobie. Marec sa pre mňa zatiaľ nezastavil, nemala som ani chvíľu pre seba samú a to sa aj odrazilo na mojej pleti... Až tento víkend je pre mňa konečne relaxačný. Všetko môžte sledovať na mojom instagrame. Všetky moje cesty, worshopy, ktorých sa zúčasťňujem, dobrôtky, ktoré papám, miesta ktoré objavujem a vecičky, ktoré tvorím. A jednu z nich tu mám pre vás dnes prichystavú ako skvelý tip na darček pre... Hockoho, alebo vášnivého milovníka čajov, ako som napríklad ja. V spolupráci s Poštovnézdarma.cz som mala možnosť vyskúšať 100ks čajových sáčkov vhodných na rôzne sypané čaje. Rozhodla som sa z nich spraviť malé čajové prekvapenia! Ako na to? Len čítajte ďalej...

ENGLISH : You are a little bit neglected here... And I am really sorry about that! You can't even imagine how much... This season is so busy for me. I could not find a moment even for myself and it stroke back on my skin... This weekend is the first one during which I can relax. You can see everything I do at my instagram account. All my journeys, the workshops I participate in, delicious food I eat, the places I visit and the stuff I create. And here I have for you one of that stuff I create, it is a great tip for the present for... Anyone who truly loves tea, for example as much as I do. I got the opportunity to try 100 pieces of teabags useful for loose tea in collaboration with Poštovnézdarma.cz. I decided to use them for a little tea surprise! And how did I do that? Just continue reading...


     Čo budeme potrebovať? Samozrejme sáčky, tie zoženiete tuto za super cenu na Poštovnézdarma.cz, ktorý mimochodom posielajú zadarmo aj na Slovensko. Ak si ich nechcete kúpiť, môžte si ich vytvoriť, ale do toho som sa ja osobne zatiaľ ešte nepúšťala... Ďalej rôzne čajíky od výmysli sveta, ktoré máte sami radi, prinesiete si z ciest alebo jedhoducho kúpite krabičku a radi by ste sa o ňu podelili. Inak, v tom prípade môžte kúpiť veľa krabičiek rôznych sáčkových čajov a len ich do vlastnoručne vyrobenej krabičky zabaliť... Jednoducho fantázií sa medze nekladú! Samozrejme potrebujeme aj nejakú tú krabičku, alebo aj sáčok, obaj, čokoľvek, kam čajíky uložíme. A potom potrebné vecičky ako ozdobky na krabičku, kúsky papiera, lepidko, lyžičku, nožnice...

ENGLISH : What are we going to need? Of course, the tea bags, which you can buy here at Poštovnézdarma.cz for a really good price. But I am not sure, if they send orders worldwide, I think just to Czechia and Slovakia. If you don't want to buy already made ones, you can create them by yourself, but I haven't done that yet... Next, you need all kinds of teas, which you personally like or you bring from your adventures, or you just buy a box and you would like to share it. Otherwise, you can also buy a lot of teabags boxes of different teas and just decorate a box by your self and you don't need to make the tea bags or fill the semifinished product... Just be creative! Of course, you need some box, or some bag, package, anything where you can put the tea bags. Then just stuff you need for the creation of box, little pieces of paper, glue, spoon, scissors...


     Keďže ja mám sáčky ako polotovar, stačí ich už len naplniť bylinkami a uzavrieť. Ja osobne som použila všetok sypaný čaj, ktorý som doma mala... Niektoré som zmiešala dokopy a vytvorila tak novú chuť.  Tú dokážete vytvoriť aj tak, že bylinkám tiež môžte pridať sušený zázvor, ovocie, kvetinky, ďalšie bylinky ako mätu, či žihľavu, ktorú dokážete nathať v záhrade alebo v lese. Najlepším na tvorbu a na chuť je český sypaný jazmínový s ružou čaj od značky Oxalis, ktorý som dostala vo vianočnom swap balíčku od Niti-B, ktorá moju záľubu vystihla úplne dokonale! Následne som sáčky uzavrela zatiahnutím šnúrky a uzlíkom, čo považujem za nesmierne praktické!

ENGLISH : Because I have those tea bags as the semifinished product, I just needed to fill them with some herbs and close. I personally filled the bags with all the loose teas I had... I mixed some of them together and I made a new flavor. You can make a new flavor also with adding dried ginger, fruit, flowers, other herbs like mint or nettle, which you can pull in your garden or in the woods. The best for the creation and for drinking is the Czech loose jasmine with rose tea from Oxalis brand, which I had in Christmas swap box from Nita-B, who totally got me and my passion for good teas! Then I just closed the bag with the nodule with the threads, which I consider as very useful!


     Po naplnení a uzavretí sáčkov ich stačí zabaliť. Ja som na nich ešte upevnila ešte lístočky, aby sa ľahšie vyberali z horúcej vody. Minimalisticky som ozdobila kartónovú krabicu, pretože tá následne putovala môjmu milovanému Jakubovi ako jeden z darčekov k druhému výročiu. Takže ozdobovanie je na vás a potom, čo všetko pekne zaschne, vložíte čajové sáčky do krabičky a...

ENGLISH : After you fill and close the tea bags, you just need to pack them into some box. I also add a piece of paper at the end of threads, because I wanted them to be easily removed from the hot water. I have chosen the minimalistic decoration of the pasteboard box because I gave the surprise tea box to my lovely Jakub as one of the presents for the second anniversary. So the decorating is up to your fantasy and after everything nicely dry out, you put the tea bags into the box and...


     A to by bolo všetko! Opäť zas nič ťažké, naopak veľmi milé a skvelé ako darček pre milovníkov rôznorodých čajov. Mimochodom, tak sa mi tento nápad páčil, že som vytvorila aj druhý set. Ten som ozdobila srdiečkovými nálepkami a uložila do plastovej krabičky, ktorú som u seba našla... Všetko som mala za pár minút hotové a budete mať aj vy, keď sa pustite do realizácie! Ak by ste ku krabičke čaju chceli podarovať aj nejaký pekný pohár, tak sa môžte inšpirovať týmito diy pohárikmi, ktorých postup som vám ukázala už dávno. Nakoľko netreba sa ničoho báť, handmade je teraz in a hlavne vlastnoručne vyrobené darčeky majú oveľa vyššiu hodnotu, ak ich vyrobíte z lásky! Prajem vám pekné chvíle pri kreácií v znení ďalšej z mojich piesní a užite si krásny, aj keď upršano-usnežený víkend!

ENGLISH : And we are finished! Again, it wasn't anything hard to create, on the other hand so cute and amazing as a present for tea lovers. By the way, I fall in love with this idea so I have created the other set. I decorated that with little heart stickers and I put the tea bags into the plastic box I found somewhere in my room... I made everything in a few minutes and you will too when you put yourself into the creation! If you would like to give with the tea box also the mugs, you can get inspired by these diy mugs, which tutorial I showed you a long time ago. Because you should not be afraid, handmade in so trendy and gifs made by yourself have a much higher value if you create them with love! I wish you nice moments during creation in the tones of another of my songs and just enjoy the rest of the beautiful weekend!


PHOTOS BY : Kejmy Tatranská / @lady_kejmy

  • 22 Comments

     Dnes opäť zas neskôr, rýchlo a jednoducho... Celý deň som piekla koláče, ako ste mohli vidieť v stories na mojom instagrame. Tiež som dnes pridala fotku týchto diy vianočných ozdôbok, ktoré som vám písala pred dvoma rokmi. Ich výroba je rýchla a jednoduchá a to vám prinášam aj dnes. Ak máte staré ozdoby, ktoré sa vám prestali páčiť a chceli by ste ich nejak jemne ozvlášniť, jedným z dobrých nápadov je niečo na ne nalepiť. Ja som použila štras a vznikli tieto krásne minimalistické ozdôbky, ktoré sa nádherne vinámajú na našom bielom stromčeku! 

ENGLISH : I am here today a little bit later again... I was baking cookies and muffins the whole day, as you could see in stories on my instagram account. I also add the picture of these diy Christmas balls today, which you could see here two years ago. The creation is so simple and fast, so I am bringing you something similar today, too. If you have some old decorations, which you don't like anymore and you would like to make them special somehow, one of the good ideas is to glue something on them. I used the strass and so I create beautiful minimalistic Christmas decorations, which look amazing at out white Christmas tree!


     Čo na ich výrobu budete potrebovať? Nejaké kamienky, korálky, sklíčka... Čokoľvek, čo vám napadne, alebo môžte použiť štras tak, ako som ho použila ja. Samozrejme gule, ktoré by ste radi ozdobili a lepidlo, či hocijaký iný spôsob, ako na ne kamienky pripevníte. Ja na to vždy používam taviacu pištoľ.

ENGLISH : What would you need for creation? Some little stones, beads, little glass components... Anything you want, but you can also use strass the way I did. Of course, some Christmas balls, which you would like to decorate and some glue, or any other way to stick the beads on. I used my silicon gun.

     A hor sa na nalepovanie! Rozmiestnenie je samozrejme na vás a vašej fantázií. Ja som kamienkov nemala veľa, takže som si ich rozdelila a nalepila ich len na jednu stranu. Ale ak ich máte viac, môžte gule polepiť aj celé! Ak sa rozhodnete použiť taviacu pištoľ a budete kamienky lepiť na plastové gule ako ja, silikón naneste najpr na kamienok a ten prilepte, aby sa vám nestalo, že tým teplom vytvoríte dieru.

ENGLISH : And so you can start to glue things on! It is up to you how you will situate your beads. I didn't have much of those strass stones, so I decided to separate them somehow and I glued them just at one side of the ball. You if you have many more of them, you can glue what the whole top of the ball! If you decide to also use the silicon gun and you will glue the beads in the plastic balls, add the silicon glue at the stone first because the silicon is so hot and you melt the plastic material from which the ball is made.

     A opäť sme sa veľkou rýchlosťou dostali na koniec. Tento turoriál vám naozaj nezaberie veľa času, je opäť nesmierne jednoduchý a krásny! Takže neverím, že by ste to nezvládli, len sa netreba hneď dopredu vzdávať... Pri práci si pustite ďalšiu vianočnú pieseň, ešte sa rýchlo zapojte do VIANOČNEJ GIVEAWAY, ktorá dnes o polnoci končí a užite si posledný predvianočný večer!

ENGLISH : And again we got to the end very fast. This tutorial hasn't taken much to create, it is also so simple and beautiful! So I believe that you can all do it, there is no way you will not create something beautiful, just don't give up before you ever try... Turn another Christmas song during work, join the CHRISTMAS GIVEAWAY, which ends at midnight and enjoys the last pre-Christmas evening!


PHOTOS BY : Kejmy Tatranská / @lady_kejmy

  • 4 Comments

     A som tu zas. Po veľmi dlhom čase... Opäť, ani tento rok, mi to prispievanie a písanie článkov každý druhý deň, naozaj nevyšlo... Opäť zvíťazila škola... A povinnosti. Ale som tu, píšem vám z mojej cesty vlakom a najbližšie dni pridám aspoň ako-taký zvyšok článkov, ktoré som mala pre vás prichystané, ale nestihla som ich spracovať skôr. Dnes to bude ďalšie diy, tentoraz ďalší super vianočný sveter, ktorý určite upúta! Už som mala možnosť obliecť si ho a tie pohľady stáli za to. Tak čo, máte chuť si taký vytvoriť a byť tým najlepším vianočným darčekom pod stromčekom?

ENGLISH : And I am here again! After a very long time... Again this year, it hasn't worked like I wanted to as I wanted to write the Christmas articles every other day... The school won again... And all of my responsibilities. but I am here, I am writing to you during my train-way back home and I will add almost all the articles I wanted to add before, but I haven't had enough time to do that. Today it will be another diy tutorial, this time another amazing Christmas sweater, which is certainly a show stopper! I already had the opportunity to wear it and those looks just worth it. So what about you, are you going to make one also for you and so you will be the best Christmas present under the tree this year?


     Určite budete potrebovať nejaký sveter, či už starý, nejaký zo sekáča, ako ten môj, alebo hocijaký, aký máte alebo kúpite. Najlepšie by bolo, aby mal väčšie očká, ktorými sa vám stuha bude príjemne previelkať. Ďalej spomínanú stuhu... Ja som použila lacnú saténovú 4 cm širokú... Ale vhodná bude akákoľvek, akú zoženiete, hlavne, aby jej bolo dosť, nakoľko minie sa naozaj rýchlo! Dobrý bude háčik na háčkovanie, nožnice a ak použijete stuhu z umelého materiálu, ktorá sa páre, tak zapaľovač.

ENGLISH : You will certainly need some sweater, the old one, or one from the secondhand, as mine, or any other you have or buy. It will be amazing if it will have a bigger loop, through which it will be more pleasant to pull the ribbon. Next to the ribbon, I have already mentioned... I used some cheap satin ribbon 4 cm / 1.57 inches width... But any kind you will find will be good, mainly you just need a lot of it, because it will pass by so quickly! The crochet hook will be useful too, the scissors and if you will use the ribbon made from the artificial fibers which unweave a lot, use the lighter.


     Tak a môžme začať. Stačí ustrihnúť dlhý pás (aspoň 8-krát dĺžka rukávu), ktorý vystačí až do polovice hrudníka. Nájdete jej stred a začnete od konca rukávu. Ak chcete ísť presne, stačí si kriedou nakresliť čiary, ktoré vás povedú priamo a nestane sa vám, že pôjdete do šírky a nebudete musieť párať, ako ja...

ENGLISH : So now we can start. Just cut a long stripe (at least 8-times long as the length of the sleeve), which will get by to the middle part of the chest. Find the middle and start at the end of the sleeve. If you want to do straight, draw the line with the chalk, so you won't go falsely and you won't need to unweave as I did...


     Ak ste došli do stredu, odstrihnite zvyšok stuhy, ktorá vám ostala a zakončite ju. Ja som použila zapaľovač a natavila ho. Inak ho môžte zašiť, zalepiť lepidlom na textil, niektorí to robia aj taviacou pištoľou, ale to nevydrží veľa praní...

ENGLISH : If you get to the middle, cut the rest of the ribbon and finish the edges. I used the lighter and  I melted the ends. Otherwise, you can sew the,, glue them with the textile glue, or some people use just the silicon gun, but it is not good if you want to wash it in the washing machine...


     Keď dokončite obe strany a ostanete so stuhami v strede, spravíte mašličku a zvyšok nejak zakamuflujete z rubnej strany svetríku. Ja som robila uzlíky a zatavila som ich zapaľovačom, ale môžte ich zalepiť alebo šiť, alebo hocijak upevniť, hlavne poriadne, aby sa vám to v práčke nerozpadlo.

ENGLISH : When you will finish both sides and the ribbons will remain in the middle of the sweater, make the bow and cover up the rest from the bottom side of the sweater. I made the knots and I melted them with the lighters, but you can also glue it, or sew it, or make it another way, but certainly end it well so it won't fall apart in the washing machine.


     A to je všetko. Opäť nič zložité a pritom tak efektné. Môžte sa takto zabaliť niekomu ako prekvapenie pod stromček, alebo byť taký blázon ako ja a jednoducho to nosiť! To všetko je len na vás. A čo vy, máte radi tie šialene gýčové vianočné svetre? Nezabudnite mi to spomenúť v komentároch a tiež nezabudnite na VIANOČNÚ GIVEAWAY, ktorá stále prebieha! Ešte si pustite ďalšiu vianočnú pieseň, prajem vám krásny zvyšok dňa a "vidíme" sa zajtra!

ENGLISH : And it would be all. Again, it is nothing hard to make and it is so effective. You can pack yourself with this sweater and make yourself as a present for someone, or you can be a crazy person like me and just wear it like that! It is just up to you. And so what about you, do you like those crazy ugly Christmas sweaters? Don't forget to mention it in the comments section down belove and also don't forget to join the CHRISTMAS GIVEAWAY, which is still on! Also, turn on another Christmas song, I wish you a nice rest of the day and I will "see" you tomorrow!


PHOTOS BY : Kejmy Tatranská / @lady_kejmy

  • 14 Comments

     Dnes toho veľa asi nenahovorím, no pripravila som si pre vás ďalšie rýchle, jednoduché a krásne diy, ktoré je však asi pre tých odvážnejších... Ja osobne som taký malý vianočný extravagantný šialenec, ktorý zbožňuje všetok ten gýč, ktorý Vianoce prinášajú! A preto si, okrem svetrov, vyrábam aj doplnky, ktoré dotvárajú vianočné outfity a jednou z nich je aj táto čelenka! Je rozkošná a k vínovým jednoduchým šatičkým úplne ako stvorená! Tak čo, pustite sa aj vy do jej výroby?

ENGLISH : Today I will not say much, but I have prepared for you another quick, simple and beautiful diy, which can be just for the adventurous ones of you... I am personally such a Christmas outrageous and little bit crazy person, who loves all of the slushy things that comes with Christmas! And so I make a lot of accessories too, which makes the whole of the outfit and one of those things is this cute headband! It is so adorable and it perfectly fits some simple burgundy dress! And what about you, are you going to make one for you too?


     Na tú budete potrebovať obyčajnú čelenku, či už plastovú alebo kovovú, akúkoľvek zoženiete. Ďalej  niečo na lepenie - lepidlo alebo taviacu pištoľ. Nejakú umelé lístočky a červené bobuľky... Tie si dokážete vytvoriť z polystrirénových guličiek, ktoré namaľujete na červeno, aleko použuteje na to nejakú umelú dekoráciu presne tak, ako som to spravila ja. Kúpila som ju niekde u vietnamcov za pár centov.

ENGLISH : You will need for the creation of some ordinary simple headband - the plastic or the metallic one, the selection is up to you. Then you should need something for bonding - glue or silicon gun. Some plastic leaves and the red plastic berries... You can make those by yourself from polystyrene little balls, which you will paint red, or you can use some decoration right I did. I bought it somewhere in some cheap Vietnamese store just for a few cents.


     Vezmete čelenku, lístočky a začnete ich priliepať na povrch čelenky. Ja na to používam silikónovú pištoľ. Pokracujete, kým nezaplníte celý vrchný obvod čelenky.

ENGLISH : Take the headband, the leaves and start to glue then on the top of the headband. I personally use the silicon gun for creation like this. Continue till you will fill the whole circuit of the top of the headband.


     Keď sú lístočky nalepené a lepidlo uschlo, môžte sa postiť do pridávania bobuliek... Tie moje už obsahovali drôtik. Ak také nezoženiete, drôtik jednoducho zapihnete a prilepíte do nich a následne sa aj jednoducho farbia. Ten však použiť nemusíte a bobuľky stačí priamo prilepiť medzi zelené lístočky.

ENGLISH : When the leaves are glued and the adhesive has already dried out, you can add the plastic berries... The ones I have used already contained the staples. If you will not find the ones with it, you can make those by yourself. Just stick the staple into the polystyrene ball and glue a little, they are easier to paint when you have a staple in them. But you can skip this step and just glue the berries between the leaves.


     A to by bolo všetko. Veľmi jednoduché a rýchle a výsledok stojí za to! Či už ako maska na karneval, oživenie vianočného outfitu, alebo super doplnok na tématické fotenie, je na vás, ako ju využijete. Pri práci si nezabudnite pustiť ďalšiu skvelú vianočnú pieseň, nezabudnite na VIANOČNÚ GIVEAWAY a aspoň vy si užite krásny víkend! Ja utekám späť do školy...

ENGLISH : And that would be all. It is so easy and quick and the result just worth it! It is amazing as a mask for some carnival, or to highlight some Christmas outfit, or as an accessory for some thematic photoshoot, it is up to you how you will use it. Just don't forget to turn on another wonderful Christmas song, join the CHRISTMAS GIVEAWAY and enjoy the weekend! At least you can do it, I need to run back to school...


PHOTOS BY : Kejmy Tatranská / @lady_kejmy

  • 16 Comments

     Ako ste už mohli vidieť prvú fotografiu na mojom instagrame, dnes som si ore vás pripravila rozsiahne diy v podobe tutoriálu, ako si ušiť veľmi jednoduchú obliečku na vankúš! A keďže sa blížia Vianoce, ľudia začínajú zdobiť svoje príbytky. A ja som mala tieto krásne materiály vo svojej zásobe textilu, rozhodla som sa vytvoriť práve obliečky na vankúše vhodné do vianočného interiéru! Však nie len tam, tento postup dokážete realizovať z akéhokoľvek tkaného materiálu na akúkoľvek príležitosť, do ktoréhokoľvek inetiéru... A ako ste tiež mohli čítať v mojom tohtoročných článkoch s tipmi na darčeky pre dámy či pre pánov, vlastnoručne vyrobený vankúšik je určite krásnym darčekom pod stromček! 

ENGLISH : As you could already see the first picture on my instagram account, today I have prepared for you the extensive diy tutorial, how to sew so simple pillowcases! And because Christmas is coming, people are already starting to decorate their homes. And I had these beautiful materials in my textile stock, so I decided to make the pillowcases perfect for the Christmas interior! But not just right for the Christmas interior, you can apply this tutorial and make any other pillowcases from any waved cloth for any other interior... And as you could also read in this year's articles with the Christmas gift tips for women and also for men, the handmade pillows can certainly be wonderful Christmas presents for anybody!


     Na kreáciu budete potrebovať hocijaký materiál. Odporúčam tkaninu, na obliečku z úpletu je vhodný iný postup, ktorý vám tiež niekedy môžem ukázať. Ak začínate šiť, kúpte si bavlné plátno - nie je lepší materiál ako balvna, tá sa vám nebude šmýkať, nemusíte ju podlepovať, nijak zvláštne začisťovať, krásne sa žehlí a poddá sa takmer všetkému! Taktiež je príjemná na používanie, takže skvelá pre začiatočníkov. Ďalej nite, ihly, žehličku, nožnice, stehovku, špendlíky, kriedu, krajčírsky meter a pre tých zručnejších aj šijací stroj a vlizelín. Keďže ja vlastním šijacie stroje, môj foto-postup bude s nimi, ale v popise si budete môcť prečítať aj alternatívne postupy pri práci tak, aby ste to zvládli aj ručne!

ENGLISH : You would need any material you find for the creation. I recommend the woven cloth, if you want to use knitwear cloth, you should choose a different sewing process, which I can also show you someday. If you are the beginner and you are going to sew for the first time, buy yourself a cotton canvas - there isn't better material like cotton, it wouldn't be slippery, you don't need to use the ironing tape, you don't need to clean the edges by any complicated way, it irons perfectly and it works with everything! It is also pleasant for using, so the best one for beginners. Next, you will need some needles, yarns, iron, temporary sewing thread, scissors, pins, chalk, tailoring meter and for the more skillful ones also the sewing machine and the ironing tape. Because I do own the sewing machines, my photo-tutorial will be with them, but I will describe the other opinions in the text, so you can read the alternatives for the working process and handle it also by your own hands!


     Nakreslila som vám, ako ti priblížne bude v skutočnosti vyzerať, ako ho vystrihnúť a následne zošiť k sebe jedlotlivé diely. Priemerná veľkosť vankúšov je 40 x 40 cm, taký kúpite takmer všade - v Ikei majú tieto vankúše po 0.99 eúr, ak si ich teda nechce tiež ušiť sami... Keď striháte materiál, nezabúdajte na záložky aspoň 1 cm, takže celková šírka a dĺžka bude 42 cm. Vezmite textíliu, odmerajte a vystrihnite 3 kusy - jeden štvorec (predný diel) a dva obĺžniky (zadné diely). Ja som šetrila materiálom a využívala zbytkové kusy textílie, takže moje obliečky na vankúše nemajú otvor v strede- Ale najjednoduchšie je otvor vytvoriť v strednej časti, takže zadné diely budú identické. Inak prekrytie odporúčam tak cca 5 cm... Pri menšom prekrytí sa otvor môže otvárať, pri väčšom doň vankúš nestrčíte... (vlastná skúsenosť).

ENGLISH : I have drawn you how it should look like when it will be done and how you should cut it and also sew it together. The average size of pillows is 40 x 40 cm / 15.75 x 15.75 inches, you can buy the pillow like this almost everywhere - you can buy the pillows like this in Ikea for 0.99 euros if you wouldn't like to sew them by yourself... When you cut the material, don't forget to add at least 1 cm at every site so the whole width of the piece will be 42 cm. Take the textile material, measure it and cut 3 pieces - one square (the front piece) and two rectangles (the back pieces). I was trying to save up the material so I used the leftover textiles, so my pillowcases don't have the opening in the middle of the back piece. But it is the simplest way to create the opening hole in the middle part, so the back pieces are identical. Otherwise, the overlay of the back pieces would be about 5 cm / 2 inches... If the overlay would be smaller, the hole can open by itself, when you will make the bigger overlay, you won't take the pillow into the pillowcase... (my own experiences).


     Vezmite zadné diely a na stranách, ktoré sa budú prekrývať, zažehlite aspoň centimetrovú záložku smerom na rub. Pri šití určite vždy používajte žehličku - extrémne vám zjednoduší prácu a taktiež sa vždy po zošití musí každý spoj rožheliť. Pri použití vŕtkavých materiálov, odporúčam prúžok jednostranného vlizelínu, ktorí nalepíte za pomoci žehličky v miestach, kde budete textíliu ohýbať a zošívať k sebe. Textília sa bude príjemnejšie šiť a materiál zachová svoj tvar. Ak nemáte overlock a používate materiál, ktorý sa páre, začistite okraj inak. Vhodné na to sú zúbkované nožnice, ktoré zakránia páraniu a je to najrýchjelší a najjednoduchšá spôsob začisťovania. Ak nemáte zúbkované nižnice a šijete strojom, použite overlockovú pätku a k nej vhodný steh, alebo stačí jednoducho využiť cik-cak steh na vašom stroji. Ak ste sa pustili do ručného šitia, použite jeden z týchto obrubovacích ručných stehov, aby sa vám materiál nepáral. 

ENGLISH : Take the back pieces and iron at least one-centimeter weight stripe directly to the seamy side- When you sew something, always use the iron - it will extremely help you with the work and also it is necessary to iron the stitched link of material. When you use fickle materials, I recommend you to use the iron tape, which you will glue to the material with the iron in the places, where you will weigh down the material and sewing together. The textile will pleasantly stay in place and sewing together and the material will retain its form. If you don't have an overlock and you use the material which unweaves at the edges, clean it up with otherwise. The serrated scissors are really good for it, which prevents to unweave the edges and it is the simplest and fastest way to clean them up. If you don't have the serrated scissors, just use the zigzag stitch on your sewing machine. If you are trying to sew it handly by your self, try and use one of these flanging hand stitches to avoid the unweaving the material.


     Keď ste kraj materiálu začistili, ohli a zažehlili na oboch zadných dieloch, preite záložku z lícnej strany k materiálu, aby vznikol čistý kraj. Ak šijete strojom, stačí použiť obyčajný rovný steh s basic pätkou a šiť môžte na vrchnej alebo na alebo spodnej. Ja šijem na prednej strane, pretože môj stroj robí škarenú spodný steh... Ak šijete ručne, použite zadný steh.

ENGLISH : When you cleaned up the edge of the material, weighed it down and ironed it at both pieces, sew the stripe to the material from the face side to rise the clear margin. If you sew it by the sewing machine, you just use the ordinary straight stitch with basic sewing foot, and you can sew it on the top of the bottom side. I sew my things on the top side because my sewing machine makes ugly bottom stitch... If you hand-sew, use the backstitch.


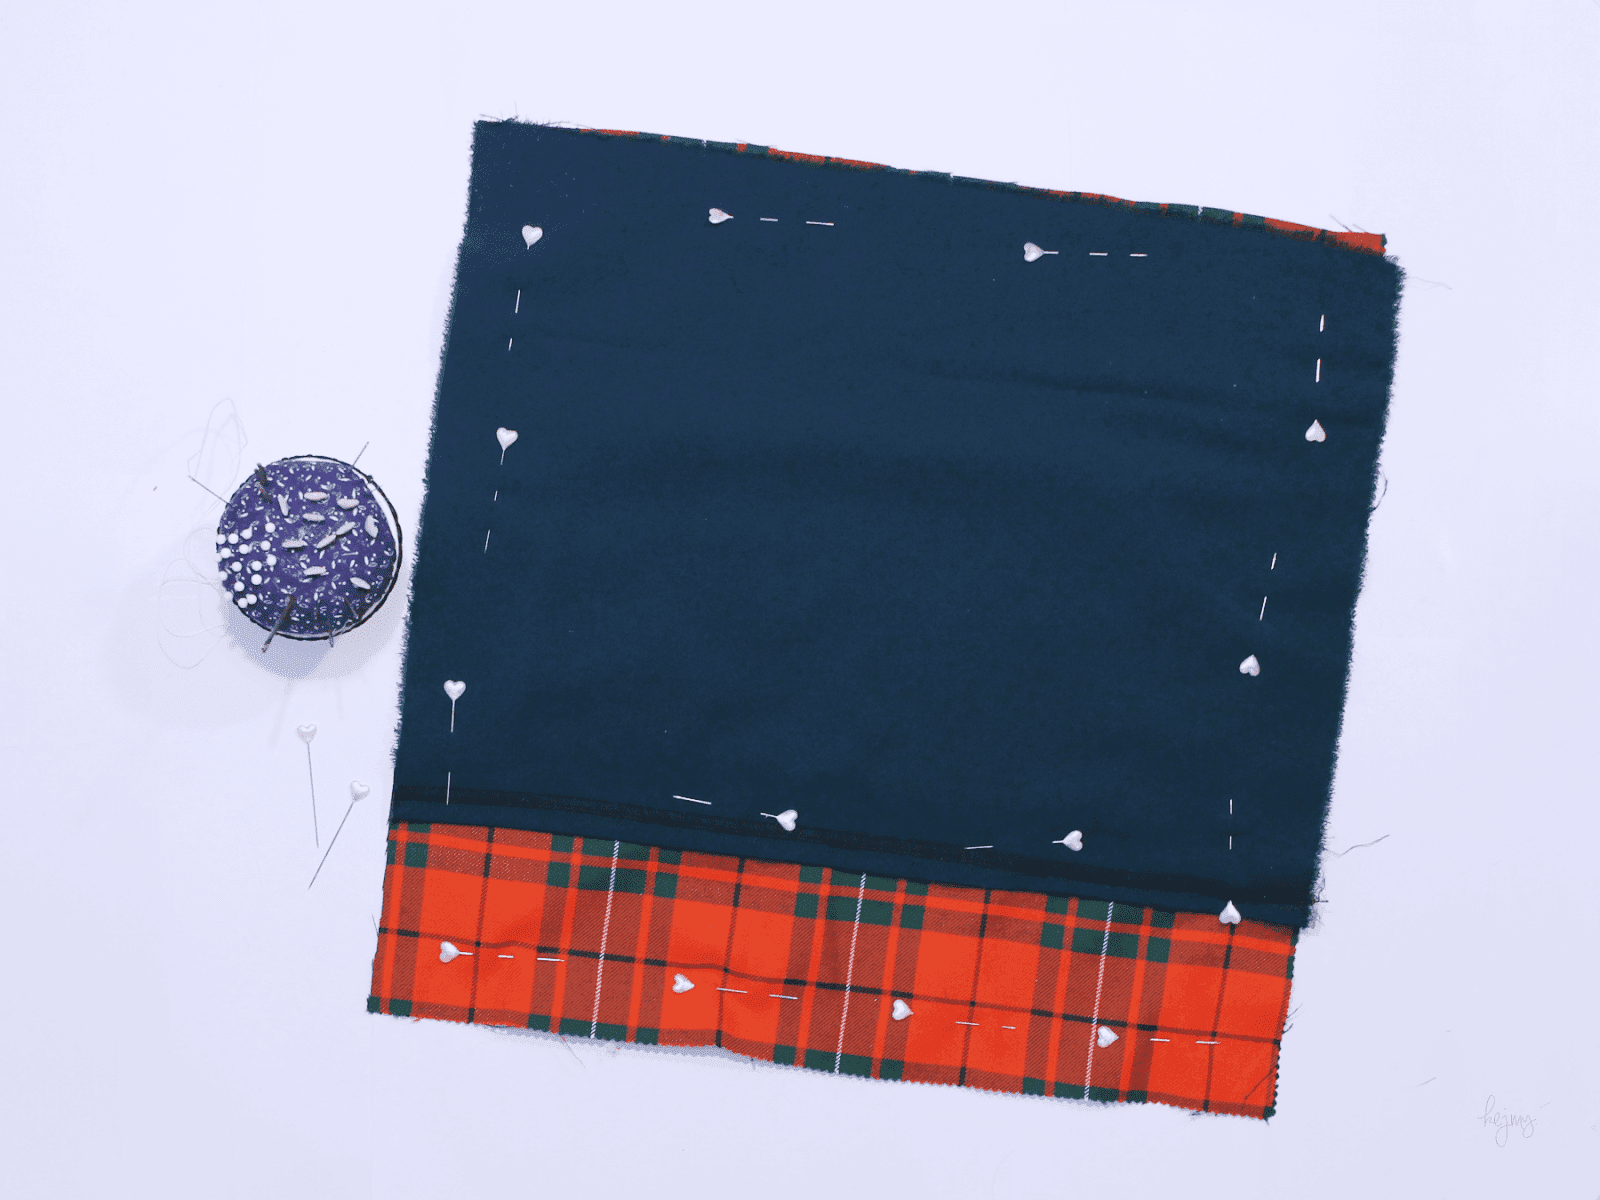
     Viditeľné kraje sú začistené, zahnuté a prešité, zvyšné sa začistia v priebehú práce. Vezmite predný diel, položte ho lícom nahor. Naň naskádajte zadné diely tak, aby boli lícom dole, t.j. aby sa prdný a zadný diel lícom dotýkali. Tiež zadné diely uložte tak, aby sa prekrávali a vytvárali tak otvor v strede zadného dielu. Všetko dočasne spojte špendlíkmi. Ak ste zručnejší v šití, stehovací krok môžte vynechať, ak teda nepožívate vŕtkavý materiál. Ak s šitím nemáte veľké skúsenosti, všetko, čo budete zošívať strojom k sebe, si stehovkou nastehujte. Materiál sa vám nebudúe posúvať, aj keď šitie je síce zdĺhavejšie, ale máte istotu, že výsledok bude presne taký, ako čakáte. Ak šijete ručne, stehovať asi nemusíte... 

ENGLISH : The visible edges are cleaned up, weigh down and sew up, we will clean the others up during the sewing process. Take the front piece, put it down on the face side up. Take the back pieces and face them the face down on the front piece at the front piece's face side - make the face sides of the pieces together. Also, put the back pieces the way they overlap each other and the way they will create the hole in the middle of the back piece. Pin everything up temporarily together. If you are skillful with the sewing, you can skip the step with the temporary sewing thread, well if you don't use the fickle material. If you don't have enough experience with the sewing, you should everything you will sew by the sewing machine sew everything up with the temporary sewing thread. The material will not move during sewing, although the sewing is much more protracted, you have the surety that the result will be right you imagine and expect. If you using the hand-sewing, I think that you don't need to use the temporary stitching...


     Následne, v miestach vyznačeným kriedou, materiál zošite a začistite. Tvar obliečky môžte obehnúť overlockom ako ja, alebo s cik-cak stehom na obyčajnom stroji, alebo zastrihnúť zúbkovanými nožnicami, alebo ručne začistiť obrubovacím alebo slučkovacím stehom. Vo veľa basic tutoriáloch, ktoré pozerám na instagrame, okraje materiálu nezačisťujú... Ak to chcete denno-denne používať a vyprať z času na čas, je dobré okraje začistiť, aby sa vám výsledný produkt hneď nerozpadol.

ENGLISH : Then sew the material in the places marked with the chalk. You can run over the shape of the pillowcase by the overlock and I did, or by the zigzag stitch at the ordinary sewing machine, or cup the edges with the serrated scissors, or handly clean up with the flange or loop stitch. In many basic tutorials, which I watch on the instagram, they don't clean up the edges of the material... If you want to use it every day and wash it from time to time, you should do it if you don't want the product to fall apart.


     Teraz už len stačí obliečku prevrátiť, hrany jemne rozžehliť a vo-a-lá, dielo je hotové! Už len vziať nejaký vankúš a obliecť ho do výslednej handmade nádhery! Ak by sa vám otvor v zadu otváral, stačí tam prišiť gombíček, suchý zips, háčik a očko alebo jednoducho patentku či dve, ktoré zadný diel udržia pokope.

ENGLISH : Now you just need to flip over the pillowcase, iron the sewed edges and voila, the handiwork is done! You just need to take the pillow and put that beautiful pillowcase on! If the hole at the backside will open so much, just sew there a little button, the velcro, hook and the eye or the little snap or to, which will hold the back pieces together.


     A krásne obliečky na vankúše sú na svete! Či už vianočné, alebo hocijaké iné, verím, že týmto postupom si ich odteraz budete len šiť robiť radosť celej rodine! Dúfam, že ste tomuto tutoriálu ako-tak pochopili, a že vám vzniknú úžasné prvotinky, ak so šitím ešte len začínate. Ak sa necháte inšpirovať, určite mi pošlite emailom alebo do správy na mojej facebook fan page fotky a ja ich tam rada uverejním v jednom z mojich albumov! Pri práci sa nalaďte na vianočnú atmosféru touto úžasnou vianočnou piesňou, nezabudnite na VIANOČNÚ GIVEAWAY a užite si kreatívny prvý adventný víkend!

ENGLISH : And the beautiful pillowcases are done! From now I hope that you will create the Christmasy or any other ones by this tutorial and you will make the whole family happy by your own handmade pillowcases! I also hope that you somehow understood this diy tutorial and that you will create wonderful debut pieces if you are the beginner with the sewing. If you will get inspired by this article, you should certainly send me the result to my email or by the message at my facebook fan page and I will show your pictures in one of my albums there! By this Christmas song tune yourself into the Christmas mood, don't forget the CHRISTMAS GIVEAWAY and enjoy the first and creative weekend of Advent!


PHOTOS BY : Kejmy Tatranská / @lady_kejmy

  • 19 Comments

     Vianočné ozdoby sú pre nás takto skoro pomerne netypické. Vždy sa zdobí až od začiatku decembra, niekedy až od Mikuláša. My doma zdobíme 2-3 dni pred sviatkami, a to som si to "tak skoro" vydobila, nakoľko sme zdobili vždy až presne na štedrí deň... Ale ak si chcete ozdôbky vyrábať sami, tak ako ja, tak sa do kreácie môžte pustiť už teraz! Dnes tu mám pre vás prvé vianočné diy, ktoré zvládne snáď každý! 

ENGLISH : Such an early Christmas decoration isn't so common in my country. We always decorate at the beginning of December, sometimes even from St. Nicolas's holiday. At my home, we decorate the interior about 2-3 days before Christmas, and that what I "fought" for, because we used to decorate everything right on Christmas day... But if you want to make your own decorations by yourself as I want to, you should start earlier, like right now! Today I have here for your first Christmas diy, which you all can handle!


     Na kreáciu budete potrebovať nejaké priesvitné gule. Či už veľké alebo malé, sklenené alebo plastové, výber je na vás. Ja som tie svoju kúpila ako sadu pätnástich plastových guličiek v Tescu za niečo málo viac ako euro. Ďalej nejaký prášok, piesok, alebo trblietky, fanzázií sa medze nekladú. Aby sa vám lepšie pracovalo, tak určite nejaký lievik, ktorý si jednoducho vytvoríte z papiera a, samozrejme, lyzička alebo malý naberačka, ktorou prášok budete naberať. Odporúčam ešte aj taviacu pištoľ alebo sekundové lepidlo, ale na to som prišla až po kreácií...

ENGLISH : You will need some transparent Christmas balls. Big or small, glassy of plastic, it is up to you. I bought the set of fifteen plastic balls in Tesco for euro and something, so not for much. Then you will need some powder, the sand of sparkles, fantasy has no limits when you create. To make your work easier, take or create some funnel, which you can easily make from the paper and, of course, some spoon or little scoop, which you will lade the power. I recommend you also the silicon gun or the superglue, but I have found that after the creation...


     Postup je veľmi jednoduchý - oddelíte vršok od gule a prázdnu guľu naplníte práškom pomocou lievika a naberačky... To je celý postup. Následne späť nasadíte vrchný diel a je hotovo. Ak vršok neprilieha, je dobré ho prilepiť, nakoľko sa môže stať, že sa prášok vysype, čo sa stalo mne a tak som ich všetky prilepila taviacou pištoľou.

ENGLISH : The process of creation is very simple - you will detach the top of the ball and you will fill the empty ball with the powder by the funnel and scoop... That the whole procedure. After that, you will take back the top of the ball and you are done. If the top won't abut, it is good to glue it to the ball, because it can happen that the power will start to spill out, that happened to me, so I glued all the tops to the balls with the silicon gun.


     A máme naozaj hotovo! Ak by ste mali chuť na niečo jemne náročnejšie, tak môžte vyskúšať tento postup, kde vlejete tekutejšie lepidlo do vnútra gule, vsypete prášok na lepidlo a vzyšok, ktorý vám ostane, vysypete von. Vianočné gule tak nebudú ťažké, ušetrite materiál a výplň sa nebude hýbať. Mne sa to však viac páči takto, tak verím, že aj vám! Teraz sa stačí už len pustiť do kreácie, pustiť si k tomu túto vianočnú pieseň, nezabudnite na GIVEAWAY a užiť si krásny zvyšok víkendu!

ENGLISH : And we are finally done! If you would like to make something a little bit challenging, so you can try this tutorial, where you will pour in some liquid glue into the ball, spill the powder on the glue and spill out the rest of the powder out. The Christmas balls won't be so heavy, you will save the material and the filling won't move. I personally prefer the first one, so I hope so, that you will like mine too! Now you just need to put yourself into the creation, turn on this Christmas song, don't forget to join the GIVEAWAY and enjoy the rest of your beautiful weekend!


PHOTOS BY : Kejmy Tatranská / @lady_kejmy

  • 6 Comments
Older Posts Home

ABOUT ME

Kejmy | 28 | Bratislava, Slovakia


"The most important thing is to enjoy your life — to be happy — it’s all that matters.”

FOLLOW MY JOURNY:

  • instagram
  • pinterest
  • facebook

LABELS

#30 DAYS OF CHRISTMAS beauty DIY DIY-ACCESSORIES DIY-FASHION DIY-INTERIOR DIY-JEWELRY DIY-OTHER fashion food giveaway how to become a designer KEJMY TATRANSKA DESIGN other outfit review SEW WITH KEJMY sewing traveling

BLOG ARCHIVE

  • ▼  2018 (34)
    • December (2)
    • November (3)
    • October (3)
    • September (5)
    • August (2)
    • July (1)
    • June (1)
    • May (2)
    • April (5)
    • March (2)
    • February (4)
    • January (4)
  • ►  2017 (38)
    • December (10)
    • November (5)
    • October (5)
    • September (5)
    • August (5)
    • July (8)
  • ►  2015 (68)
    • December (6)
    • November (8)
    • October (8)
    • September (7)
    • August (8)
    • July (5)
    • June (6)
    • May (3)
    • April (5)
    • March (4)
    • February (5)
    • January (3)
  • ►  2014 (123)
    • December (19)
    • November (12)
    • October (7)
    • September (8)
    • August (12)
    • July (12)
    • June (7)
    • May (4)
    • April (6)
    • March (10)
    • February (15)
    • January (11)
  • ►  2013 (183)
    • December (15)
    • November (8)
    • October (9)
    • September (13)
    • August (23)
    • July (18)
    • June (20)
    • May (15)
    • April (19)
    • March (18)
    • February (15)
    • January (10)
  • ►  2012 (197)
    • December (19)
    • November (15)
    • October (16)
    • September (19)
    • August (22)
    • July (20)
    • June (13)
    • May (15)
    • April (14)
    • March (15)
    • February (14)
    • January (15)
  • ►  2011 (89)
    • December (17)
    • November (13)
    • October (13)
    • September (16)
    • August (24)
    • July (6)

GOOGLE FRIENDS

instagram

© KEJMY TATRANSKA | 2022 | Template Created By : Blogger Templates | ThemeXpose.

Back to top