THE WORLD BY KEJMY.

  • HOME
  • MENU
  • _BEAUTY
  • _DIY
  • _FASHION
  • _OTHER
  • _TRAVELING
  • ABOUT
  • CONTACT

      Opäť sa k vám prihováram a prichádzam s malou #diy inšpiráciou na malé-milé svietničky, ktoré zútulnia nejeden vianočný priestor, či vyčaria iskričku radosti v očiach ako pekný vianočný darček, ktorý môžete niekomu z lásky darovať. 

     Pri kreácií sa, samozrejme, medze nekladú a preto je na vás, akú sviečočku, či obal na ňu, použijete. Ja som pri výrobe už mala sviečočky v sklíčku, ktoré si tiež viete veľmi jednoducho vyrobiť sami. Potom už je na rade len lepidlo, umelý sneh alebo biele trblietky, stužka na ozdobu a vo-á-lá, krásna vianočná dekorácia je na svete!

     Tak čo, skúsite tento malý #diy projektík aj vy? A nezabudnite si pri práci pustiť ďalšiu vianočnú pieseň z môjho vianočného playlistu a užívajte si tieto krásne decembrové chvíle naplno!


ENGLISH : I'm here again with some nice words about another little #diy inspiration, and today I bring you these little handmade candlestick you can make yourself too. They might cozy up any Christmas home, or they can make a little spark of happiness in the eyes of someone you'll give them to as a Christmas present made out of love.

     There are no limits during the creation process, so it's just up to you what kind of little candles you'll use for this project. I've chose the ones in the jars which you can also make yourself if you're that handy. Then it's just a glue, fake show or sparkles, some ribbons for decorating and there you have some wonderful decoration for this Christmas!

    So are you going to try this little #diy project? And don't forget to turn on another Christmas song from my Christmas playlist and enjoy these beautiful moments of December to the fullest!


PHOTOS : Kejmy Tatranská / @lady_kejmy

  • 1 Comments

     Sobota ako každá iná a pritom tam výnimočná... Dnes je prvý decembrový deň. Vonku je krásne bielo, mráz štípe líčka... To pravé počasie, aké by malo v decembri byť a trvať celý mesiac! A keďže sa dnes začalo odpočítavanie do Vianoc, najlepšie je ho začať prvým "okienkom" v adventnom kalendári... Ja tohto roku ten klasický nemám. Rozhodla som sa vytvoriť si niečo jedinečné a podľa vlastných predstáv! A ako to dopadlo? Len čítajte ďalej!

     Vzala som si nádherný vianočný baliaci papier, vystrihla z neho malinké obdĺžničky a vytvorila malé papierové vrecúška, do ktorých som vložila malé čokoládky. Kadý jeden z nich som uzatvorila a pripla srdiečkovým štipčekom s číslami (kúpila som ich vo Flying Tiger, ale môžete si ich vytvoriť aj sami za pomoci lepidla a papiera) na listnatú girlandu pripomínajúci imelo. To som nastrihala na rovnako dlhé štyri kúsky a nalepila ich na stenu pomocou papierovej pásky. A čudujte sa svete, mala som hotovo! 

    Naozaj veľmi jednoduché a rýchle! Nemáte sa čoho báť, stačí dobrý nápad a chuť tvoriť! Verím, že si jeden taký vytvoríte aj vy, pustite si pri jeho kreácií ďalšiu super vianočnú pieseň a užite si krásny prvý adventný víkend!


ENGLISH : Saturday as ordinary as the other, but at the same time so special... Today is the first day of December. There is snow outside, the frost makes the chicks red... This is the right weather which should last for whole December! And since the countdown of Christmas has begun today, the best way to start it is with the first "window" on the advent calendar... I don't have the classic one this year. I decided to create something different and the way I dreamed of it should look like! And how it all ends? Just read the rest of the article!

     I took the beautiful Christmas wrapping paper, I cut s little rectangles from it and I've made a small paper bags from them into which I've put small pieces of chocolates. I closed every single of one of them and I hung them with the tweak with hearts and numbers on them (I've bought them in Flying Tiger, but you make something similar by your own with a piece of paper and a little bit of glue) on the thin garland with leaves which looks like a mistletoe. I cut the garland into the same four pieces and I put them on the wall with the paper tape. And well, I was all done!

     It is really easy and quick to create! You don't need to be afraid to make it, you just need a good idea and the taste to create! I believe that you will make your own advent calendar, just turn on another Christmas song during the work and enjoy the first and beautiful weekend of Advent!


PHOTOS : Kejmy Tatranská / @lady_kejmy

  • 6 Comments

     Dnes opäť zas neskôr, rýchlo a jednoducho... Celý deň som piekla koláče, ako ste mohli vidieť v stories na mojom instagrame. Tiež som dnes pridala fotku týchto diy vianočných ozdôbok, ktoré som vám písala pred dvoma rokmi. Ich výroba je rýchla a jednoduchá a to vám prinášam aj dnes. Ak máte staré ozdoby, ktoré sa vám prestali páčiť a chceli by ste ich nejak jemne ozvlášniť, jedným z dobrých nápadov je niečo na ne nalepiť. Ja som použila štras a vznikli tieto krásne minimalistické ozdôbky, ktoré sa nádherne vinámajú na našom bielom stromčeku! 

ENGLISH : I am here today a little bit later again... I was baking cookies and muffins the whole day, as you could see in stories on my instagram account. I also add the picture of these diy Christmas balls today, which you could see here two years ago. The creation is so simple and fast, so I am bringing you something similar today, too. If you have some old decorations, which you don't like anymore and you would like to make them special somehow, one of the good ideas is to glue something on them. I used the strass and so I create beautiful minimalistic Christmas decorations, which look amazing at out white Christmas tree!


     Čo na ich výrobu budete potrebovať? Nejaké kamienky, korálky, sklíčka... Čokoľvek, čo vám napadne, alebo môžte použiť štras tak, ako som ho použila ja. Samozrejme gule, ktoré by ste radi ozdobili a lepidlo, či hocijaký iný spôsob, ako na ne kamienky pripevníte. Ja na to vždy používam taviacu pištoľ.

ENGLISH : What would you need for creation? Some little stones, beads, little glass components... Anything you want, but you can also use strass the way I did. Of course, some Christmas balls, which you would like to decorate and some glue, or any other way to stick the beads on. I used my silicon gun.

     A hor sa na nalepovanie! Rozmiestnenie je samozrejme na vás a vašej fantázií. Ja som kamienkov nemala veľa, takže som si ich rozdelila a nalepila ich len na jednu stranu. Ale ak ich máte viac, môžte gule polepiť aj celé! Ak sa rozhodnete použiť taviacu pištoľ a budete kamienky lepiť na plastové gule ako ja, silikón naneste najpr na kamienok a ten prilepte, aby sa vám nestalo, že tým teplom vytvoríte dieru.

ENGLISH : And so you can start to glue things on! It is up to you how you will situate your beads. I didn't have much of those strass stones, so I decided to separate them somehow and I glued them just at one side of the ball. You if you have many more of them, you can glue what the whole top of the ball! If you decide to also use the silicon gun and you will glue the beads in the plastic balls, add the silicon glue at the stone first because the silicon is so hot and you melt the plastic material from which the ball is made.

     A opäť sme sa veľkou rýchlosťou dostali na koniec. Tento turoriál vám naozaj nezaberie veľa času, je opäť nesmierne jednoduchý a krásny! Takže neverím, že by ste to nezvládli, len sa netreba hneď dopredu vzdávať... Pri práci si pustite ďalšiu vianočnú pieseň, ešte sa rýchlo zapojte do VIANOČNEJ GIVEAWAY, ktorá dnes o polnoci končí a užite si posledný predvianočný večer!

ENGLISH : And again we got to the end very fast. This tutorial hasn't taken much to create, it is also so simple and beautiful! So I believe that you can all do it, there is no way you will not create something beautiful, just don't give up before you ever try... Turn another Christmas song during work, join the CHRISTMAS GIVEAWAY, which ends at midnight and enjoys the last pre-Christmas evening!


PHOTOS BY : Kejmy Tatranská / @lady_kejmy

  • 4 Comments

     Ako ste už mohli vidieť prvú fotografiu na mojom instagrame, dnes som si ore vás pripravila rozsiahne diy v podobe tutoriálu, ako si ušiť veľmi jednoduchú obliečku na vankúš! A keďže sa blížia Vianoce, ľudia začínajú zdobiť svoje príbytky. A ja som mala tieto krásne materiály vo svojej zásobe textilu, rozhodla som sa vytvoriť práve obliečky na vankúše vhodné do vianočného interiéru! Však nie len tam, tento postup dokážete realizovať z akéhokoľvek tkaného materiálu na akúkoľvek príležitosť, do ktoréhokoľvek inetiéru... A ako ste tiež mohli čítať v mojom tohtoročných článkoch s tipmi na darčeky pre dámy či pre pánov, vlastnoručne vyrobený vankúšik je určite krásnym darčekom pod stromček! 

ENGLISH : As you could already see the first picture on my instagram account, today I have prepared for you the extensive diy tutorial, how to sew so simple pillowcases! And because Christmas is coming, people are already starting to decorate their homes. And I had these beautiful materials in my textile stock, so I decided to make the pillowcases perfect for the Christmas interior! But not just right for the Christmas interior, you can apply this tutorial and make any other pillowcases from any waved cloth for any other interior... And as you could also read in this year's articles with the Christmas gift tips for women and also for men, the handmade pillows can certainly be wonderful Christmas presents for anybody!


     Na kreáciu budete potrebovať hocijaký materiál. Odporúčam tkaninu, na obliečku z úpletu je vhodný iný postup, ktorý vám tiež niekedy môžem ukázať. Ak začínate šiť, kúpte si bavlné plátno - nie je lepší materiál ako balvna, tá sa vám nebude šmýkať, nemusíte ju podlepovať, nijak zvláštne začisťovať, krásne sa žehlí a poddá sa takmer všetkému! Taktiež je príjemná na používanie, takže skvelá pre začiatočníkov. Ďalej nite, ihly, žehličku, nožnice, stehovku, špendlíky, kriedu, krajčírsky meter a pre tých zručnejších aj šijací stroj a vlizelín. Keďže ja vlastním šijacie stroje, môj foto-postup bude s nimi, ale v popise si budete môcť prečítať aj alternatívne postupy pri práci tak, aby ste to zvládli aj ručne!

ENGLISH : You would need any material you find for the creation. I recommend the woven cloth, if you want to use knitwear cloth, you should choose a different sewing process, which I can also show you someday. If you are the beginner and you are going to sew for the first time, buy yourself a cotton canvas - there isn't better material like cotton, it wouldn't be slippery, you don't need to use the ironing tape, you don't need to clean the edges by any complicated way, it irons perfectly and it works with everything! It is also pleasant for using, so the best one for beginners. Next, you will need some needles, yarns, iron, temporary sewing thread, scissors, pins, chalk, tailoring meter and for the more skillful ones also the sewing machine and the ironing tape. Because I do own the sewing machines, my photo-tutorial will be with them, but I will describe the other opinions in the text, so you can read the alternatives for the working process and handle it also by your own hands!


     Nakreslila som vám, ako ti priblížne bude v skutočnosti vyzerať, ako ho vystrihnúť a následne zošiť k sebe jedlotlivé diely. Priemerná veľkosť vankúšov je 40 x 40 cm, taký kúpite takmer všade - v Ikei majú tieto vankúše po 0.99 eúr, ak si ich teda nechce tiež ušiť sami... Keď striháte materiál, nezabúdajte na záložky aspoň 1 cm, takže celková šírka a dĺžka bude 42 cm. Vezmite textíliu, odmerajte a vystrihnite 3 kusy - jeden štvorec (predný diel) a dva obĺžniky (zadné diely). Ja som šetrila materiálom a využívala zbytkové kusy textílie, takže moje obliečky na vankúše nemajú otvor v strede- Ale najjednoduchšie je otvor vytvoriť v strednej časti, takže zadné diely budú identické. Inak prekrytie odporúčam tak cca 5 cm... Pri menšom prekrytí sa otvor môže otvárať, pri väčšom doň vankúš nestrčíte... (vlastná skúsenosť).

ENGLISH : I have drawn you how it should look like when it will be done and how you should cut it and also sew it together. The average size of pillows is 40 x 40 cm / 15.75 x 15.75 inches, you can buy the pillow like this almost everywhere - you can buy the pillows like this in Ikea for 0.99 euros if you wouldn't like to sew them by yourself... When you cut the material, don't forget to add at least 1 cm at every site so the whole width of the piece will be 42 cm. Take the textile material, measure it and cut 3 pieces - one square (the front piece) and two rectangles (the back pieces). I was trying to save up the material so I used the leftover textiles, so my pillowcases don't have the opening in the middle of the back piece. But it is the simplest way to create the opening hole in the middle part, so the back pieces are identical. Otherwise, the overlay of the back pieces would be about 5 cm / 2 inches... If the overlay would be smaller, the hole can open by itself, when you will make the bigger overlay, you won't take the pillow into the pillowcase... (my own experiences).


     Vezmite zadné diely a na stranách, ktoré sa budú prekrývať, zažehlite aspoň centimetrovú záložku smerom na rub. Pri šití určite vždy používajte žehličku - extrémne vám zjednoduší prácu a taktiež sa vždy po zošití musí každý spoj rožheliť. Pri použití vŕtkavých materiálov, odporúčam prúžok jednostranného vlizelínu, ktorí nalepíte za pomoci žehličky v miestach, kde budete textíliu ohýbať a zošívať k sebe. Textília sa bude príjemnejšie šiť a materiál zachová svoj tvar. Ak nemáte overlock a používate materiál, ktorý sa páre, začistite okraj inak. Vhodné na to sú zúbkované nožnice, ktoré zakránia páraniu a je to najrýchjelší a najjednoduchšá spôsob začisťovania. Ak nemáte zúbkované nižnice a šijete strojom, použite overlockovú pätku a k nej vhodný steh, alebo stačí jednoducho využiť cik-cak steh na vašom stroji. Ak ste sa pustili do ručného šitia, použite jeden z týchto obrubovacích ručných stehov, aby sa vám materiál nepáral. 

ENGLISH : Take the back pieces and iron at least one-centimeter weight stripe directly to the seamy side- When you sew something, always use the iron - it will extremely help you with the work and also it is necessary to iron the stitched link of material. When you use fickle materials, I recommend you to use the iron tape, which you will glue to the material with the iron in the places, where you will weigh down the material and sewing together. The textile will pleasantly stay in place and sewing together and the material will retain its form. If you don't have an overlock and you use the material which unweaves at the edges, clean it up with otherwise. The serrated scissors are really good for it, which prevents to unweave the edges and it is the simplest and fastest way to clean them up. If you don't have the serrated scissors, just use the zigzag stitch on your sewing machine. If you are trying to sew it handly by your self, try and use one of these flanging hand stitches to avoid the unweaving the material.


     Keď ste kraj materiálu začistili, ohli a zažehlili na oboch zadných dieloch, preite záložku z lícnej strany k materiálu, aby vznikol čistý kraj. Ak šijete strojom, stačí použiť obyčajný rovný steh s basic pätkou a šiť môžte na vrchnej alebo na alebo spodnej. Ja šijem na prednej strane, pretože môj stroj robí škarenú spodný steh... Ak šijete ručne, použite zadný steh.

ENGLISH : When you cleaned up the edge of the material, weighed it down and ironed it at both pieces, sew the stripe to the material from the face side to rise the clear margin. If you sew it by the sewing machine, you just use the ordinary straight stitch with basic sewing foot, and you can sew it on the top of the bottom side. I sew my things on the top side because my sewing machine makes ugly bottom stitch... If you hand-sew, use the backstitch.


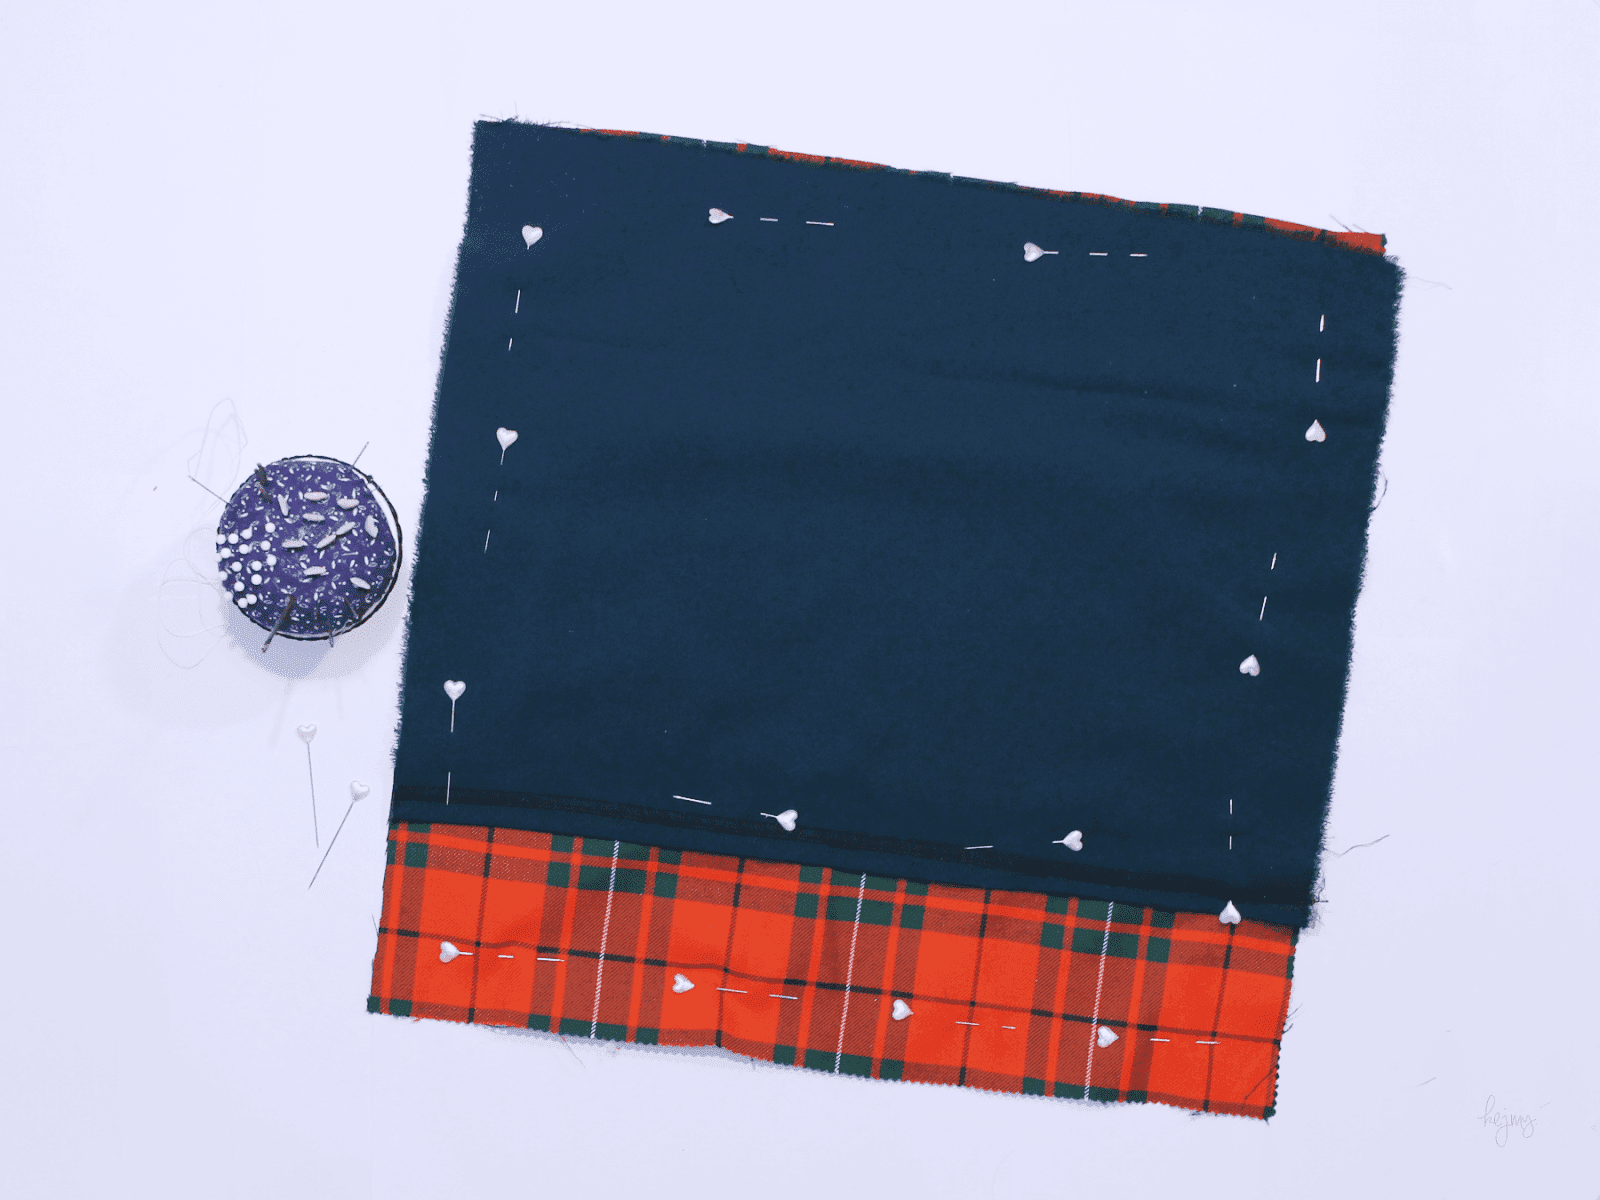
     Viditeľné kraje sú začistené, zahnuté a prešité, zvyšné sa začistia v priebehú práce. Vezmite predný diel, položte ho lícom nahor. Naň naskádajte zadné diely tak, aby boli lícom dole, t.j. aby sa prdný a zadný diel lícom dotýkali. Tiež zadné diely uložte tak, aby sa prekrávali a vytvárali tak otvor v strede zadného dielu. Všetko dočasne spojte špendlíkmi. Ak ste zručnejší v šití, stehovací krok môžte vynechať, ak teda nepožívate vŕtkavý materiál. Ak s šitím nemáte veľké skúsenosti, všetko, čo budete zošívať strojom k sebe, si stehovkou nastehujte. Materiál sa vám nebudúe posúvať, aj keď šitie je síce zdĺhavejšie, ale máte istotu, že výsledok bude presne taký, ako čakáte. Ak šijete ručne, stehovať asi nemusíte... 

ENGLISH : The visible edges are cleaned up, weigh down and sew up, we will clean the others up during the sewing process. Take the front piece, put it down on the face side up. Take the back pieces and face them the face down on the front piece at the front piece's face side - make the face sides of the pieces together. Also, put the back pieces the way they overlap each other and the way they will create the hole in the middle of the back piece. Pin everything up temporarily together. If you are skillful with the sewing, you can skip the step with the temporary sewing thread, well if you don't use the fickle material. If you don't have enough experience with the sewing, you should everything you will sew by the sewing machine sew everything up with the temporary sewing thread. The material will not move during sewing, although the sewing is much more protracted, you have the surety that the result will be right you imagine and expect. If you using the hand-sewing, I think that you don't need to use the temporary stitching...


     Následne, v miestach vyznačeným kriedou, materiál zošite a začistite. Tvar obliečky môžte obehnúť overlockom ako ja, alebo s cik-cak stehom na obyčajnom stroji, alebo zastrihnúť zúbkovanými nožnicami, alebo ručne začistiť obrubovacím alebo slučkovacím stehom. Vo veľa basic tutoriáloch, ktoré pozerám na instagrame, okraje materiálu nezačisťujú... Ak to chcete denno-denne používať a vyprať z času na čas, je dobré okraje začistiť, aby sa vám výsledný produkt hneď nerozpadol.

ENGLISH : Then sew the material in the places marked with the chalk. You can run over the shape of the pillowcase by the overlock and I did, or by the zigzag stitch at the ordinary sewing machine, or cup the edges with the serrated scissors, or handly clean up with the flange or loop stitch. In many basic tutorials, which I watch on the instagram, they don't clean up the edges of the material... If you want to use it every day and wash it from time to time, you should do it if you don't want the product to fall apart.


     Teraz už len stačí obliečku prevrátiť, hrany jemne rozžehliť a vo-a-lá, dielo je hotové! Už len vziať nejaký vankúš a obliecť ho do výslednej handmade nádhery! Ak by sa vám otvor v zadu otváral, stačí tam prišiť gombíček, suchý zips, háčik a očko alebo jednoducho patentku či dve, ktoré zadný diel udržia pokope.

ENGLISH : Now you just need to flip over the pillowcase, iron the sewed edges and voila, the handiwork is done! You just need to take the pillow and put that beautiful pillowcase on! If the hole at the backside will open so much, just sew there a little button, the velcro, hook and the eye or the little snap or to, which will hold the back pieces together.


     A krásne obliečky na vankúše sú na svete! Či už vianočné, alebo hocijaké iné, verím, že týmto postupom si ich odteraz budete len šiť robiť radosť celej rodine! Dúfam, že ste tomuto tutoriálu ako-tak pochopili, a že vám vzniknú úžasné prvotinky, ak so šitím ešte len začínate. Ak sa necháte inšpirovať, určite mi pošlite emailom alebo do správy na mojej facebook fan page fotky a ja ich tam rada uverejním v jednom z mojich albumov! Pri práci sa nalaďte na vianočnú atmosféru touto úžasnou vianočnou piesňou, nezabudnite na VIANOČNÚ GIVEAWAY a užite si kreatívny prvý adventný víkend!

ENGLISH : And the beautiful pillowcases are done! From now I hope that you will create the Christmasy or any other ones by this tutorial and you will make the whole family happy by your own handmade pillowcases! I also hope that you somehow understood this diy tutorial and that you will create wonderful debut pieces if you are the beginner with the sewing. If you will get inspired by this article, you should certainly send me the result to my email or by the message at my facebook fan page and I will show your pictures in one of my albums there! By this Christmas song tune yourself into the Christmas mood, don't forget the CHRISTMAS GIVEAWAY and enjoy the first and creative weekend of Advent!


PHOTOS BY : Kejmy Tatranská / @lady_kejmy

  • 19 Comments

     Vianočné ozdoby sú pre nás takto skoro pomerne netypické. Vždy sa zdobí až od začiatku decembra, niekedy až od Mikuláša. My doma zdobíme 2-3 dni pred sviatkami, a to som si to "tak skoro" vydobila, nakoľko sme zdobili vždy až presne na štedrí deň... Ale ak si chcete ozdôbky vyrábať sami, tak ako ja, tak sa do kreácie môžte pustiť už teraz! Dnes tu mám pre vás prvé vianočné diy, ktoré zvládne snáď každý! 

ENGLISH : Such an early Christmas decoration isn't so common in my country. We always decorate at the beginning of December, sometimes even from St. Nicolas's holiday. At my home, we decorate the interior about 2-3 days before Christmas, and that what I "fought" for, because we used to decorate everything right on Christmas day... But if you want to make your own decorations by yourself as I want to, you should start earlier, like right now! Today I have here for your first Christmas diy, which you all can handle!


     Na kreáciu budete potrebovať nejaké priesvitné gule. Či už veľké alebo malé, sklenené alebo plastové, výber je na vás. Ja som tie svoju kúpila ako sadu pätnástich plastových guličiek v Tescu za niečo málo viac ako euro. Ďalej nejaký prášok, piesok, alebo trblietky, fanzázií sa medze nekladú. Aby sa vám lepšie pracovalo, tak určite nejaký lievik, ktorý si jednoducho vytvoríte z papiera a, samozrejme, lyzička alebo malý naberačka, ktorou prášok budete naberať. Odporúčam ešte aj taviacu pištoľ alebo sekundové lepidlo, ale na to som prišla až po kreácií...

ENGLISH : You will need some transparent Christmas balls. Big or small, glassy of plastic, it is up to you. I bought the set of fifteen plastic balls in Tesco for euro and something, so not for much. Then you will need some powder, the sand of sparkles, fantasy has no limits when you create. To make your work easier, take or create some funnel, which you can easily make from the paper and, of course, some spoon or little scoop, which you will lade the power. I recommend you also the silicon gun or the superglue, but I have found that after the creation...


     Postup je veľmi jednoduchý - oddelíte vršok od gule a prázdnu guľu naplníte práškom pomocou lievika a naberačky... To je celý postup. Následne späť nasadíte vrchný diel a je hotovo. Ak vršok neprilieha, je dobré ho prilepiť, nakoľko sa môže stať, že sa prášok vysype, čo sa stalo mne a tak som ich všetky prilepila taviacou pištoľou.

ENGLISH : The process of creation is very simple - you will detach the top of the ball and you will fill the empty ball with the powder by the funnel and scoop... That the whole procedure. After that, you will take back the top of the ball and you are done. If the top won't abut, it is good to glue it to the ball, because it can happen that the power will start to spill out, that happened to me, so I glued all the tops to the balls with the silicon gun.


     A máme naozaj hotovo! Ak by ste mali chuť na niečo jemne náročnejšie, tak môžte vyskúšať tento postup, kde vlejete tekutejšie lepidlo do vnútra gule, vsypete prášok na lepidlo a vzyšok, ktorý vám ostane, vysypete von. Vianočné gule tak nebudú ťažké, ušetrite materiál a výplň sa nebude hýbať. Mne sa to však viac páči takto, tak verím, že aj vám! Teraz sa stačí už len pustiť do kreácie, pustiť si k tomu túto vianočnú pieseň, nezabudnite na GIVEAWAY a užiť si krásny zvyšok víkendu!

ENGLISH : And we are finally done! If you would like to make something a little bit challenging, so you can try this tutorial, where you will pour in some liquid glue into the ball, spill the powder on the glue and spill out the rest of the powder out. The Christmas balls won't be so heavy, you will save the material and the filling won't move. I personally prefer the first one, so I hope so, that you will like mine too! Now you just need to put yourself into the creation, turn on this Christmas song, don't forget to join the GIVEAWAY and enjoy the rest of your beautiful weekend!


PHOTOS BY : Kejmy Tatranská / @lady_kejmy

  • 6 Comments

     Kvety. Sú potešením každej ženy. Sú prejavom lásky a náklonnosti, úcty a pokory, šastia a slasti, ktoré sama žena predstavuje. Áno, dostala som štyri kytice ruží, každú inej farby... Síce párne číslo, ale jedna kvetinka v žltej kytičke bola úplne suchá, takže ich bolo nakoniec tridsaťpäť! Ak si hovoríte, ach tak veľa... Tak mne by stačila aj jedna k menimám, ktoré sme spolu oslavovali. Ale myslím, že to bola kompenzácia za všetky sviatky, na ktoré mi kytičky, tak nejak... Zabudol kúpiť. A ak toto môj milý číta, tak ma nebude mať rád ako doteraz! Sú však nádherné a ja som z nich mala veľkú radosť... No prišiel moment, aby som ich dala do vody. Ako študent žijúci na internáte, ktorý má viac vecí ako bežný študent, vázičku naozaj nemám. Musela som vzať fľašu a dať ich do nej... Nepáčilo sa mi, že tak krásne kvety musia byť v tak nepeknej nádobe. A tak som sa pustila do snáď najľahšieho a najrýchlejšieho diy projektu, aký som kedy skúšala! 

ENGLISH : Flowers. They are a pleasure for every woman. They are the expression of love and affection, respect and humility, happiness and delight, which the woman presents herself. Yes, I have got four bouquets of roses, each of another color... Well, it is the even number, but one of the yellow flowers dried out, so in the end, I got thirty-five of them! If you say yourself, that is is so much... I would be happy with just one for my name-day which we celebrated together. But I think that it was the compensation for all the bouquets, which he somehow forgot be to give... And if my dear man is reading this, he would not like me as much as he did till today! They are so beautiful and I was so happy when I got them... But then came the moment to put them into the water. As a student living in the dormitory, who has many more things as a regular student, I have everything but the vase. I had to take the plastic bottle and put it in... I did not like it that I have to have so pretty flowers in such an ugly jar. And so I put myself into the simplest and fastest diy project which I've ever tried!


     Na realizáciu nebudete potrebovať veľa. Stačí plastová fľaša, ale použiť môžte aj sklenenú, kovovú, či hocijakú inú nádobu. Ak však použijete plastovú, tak ako ja, odporúčam vám nepoužiť tavnú pištoľ... Po chvíli sa mi to z toho tepla začalo krútiť a taviť. Samozrejme som si zalepila prsty a pracovala veľmi rýchlo. Na plast vám bude stačiť aj obyčajný herkules, ktorý ja momentálne nemám... Ďalej záleží na vás, aké silné prúžky túžite mať, v tom prípade môžte použiť aj tenkú niť, či nejaké hrubé lanko, kreativite sa medze nekladú!

E. : You won't need much for the realization. You just need the plastic bottle, but you also can use any bottle you want - the glassy one, the metal one, or any jar you find. But if you want to use the plastic one as I did, just don't use the silicon gun... It started to wiggle and melt from the heat. Of course, I stick up my fingers and I needed to work so fast. You can just use some ordinary glue like herkules, which I do not have right now... Then it is up to you, what kind of stripes you desire for. In that case, you can use any lead you have - the thin yarn or maybe some thick cable, the limits of creativity are not set!


     Odrežte alebo odtrihnite fľašu v požadovanej výške. Určite pri tom buďte opatrní a dávajte pozor, prsty sa vám pri realizácií, a aj iných činnostiach, určite ešte zídu!

E. : Cut with the knife or the scissors the top of the bottle in the height you want. Just be careful during this, you certainly will need your finger during the realization and also other activities! 


     Tak vezmite niť, bavlnku, vlnu či lanko a omotávajte na miesta vopred natreté lepidlom či silikónom. Je na vás, z ktorej strany začnete, koniec a aj začiatok nite nezabudnite odstrihnúť a poriadne pripevniť. Pri otvore je tiež dobré dať adhezíva trochu viac, ak do vázičky planujete dávať živé kvety s vodou.

E. : Then take the yarn, the lead, the fiber or the cable and start to wrap the places which you already glued with the glue or silicon gun. It is up to you from which side you would like to start, just do not forget to cut the beginning and also the end of the yarn and secure them properly. Also, use more adhesive at the opening if you want to use it as a vase for live flowers with water.


     A vázička je na svete! Teraz ju stačí už len naplniť krásnymi kvetinkami a oživiť nimi nejednu miestnosť. Je to naozaj jednoduché a pomerne rýchle! A ak mi zase v komentároch plánujete písať, že by ste to nezvládli, tak tentoraz vám to nevezmem, pretože na tomto naozaj niet čo pokaziť! Takže si pustite ďalšiu z mojich piesní a šup sa do kreácie! Tiež nezabudnite na prebiehajúcu letnú GIVEAWAY!

ENGLISH : And the vase is done! Now you just need to fill it with beautiful flowers and revive the room with them. It is so simple and relatively fast! And if you are going to write me in the comments section that you will not handle this, I am not going to take it because this really wasn't hard! So just listen to another of my songs and get yourself to the work! And also, do not forget to join my summer GIVEAWAY!


PHOTOS BY : Kejmy Tatranská / @lady_kejmy

  • 38 Comments
     A je to v hajzli... Pardón za výraz, ale je to tak. Môj život sa momentálne točí okolo školy, bakalárky, semestrálky a... Pendlujem medzi Prahou a Libercom, medzi Libercom a Prešovom, nezastavím sa a dokonca som už 3 týždne nemala poriadny spánok. Väčšinou naň nemám čas a ak sa aj nejaký nájde, tak sa zobudím a už ďalej nemôžem zaspať, pretože sa mi hlava plní myšlienkami. Začne pracovať ako taký robot a preberie celé moje vedomie a nedovolí mu vypnúť naplno... A to mám hlavu plnú totálnych nezmyslov! Vianočných nápadov, zoznamu darčekov, príprav na sviatky, školy a prác, ktoré potrebujem odovzdať a dokonca aj sobotňajšej cesty domov... Prvý krát vyskúšam spolujazdu! Ak sa vám už do Vianoc neozvem, tak som bola niekde počas takmer 700 kilometrovej cesty niekde zahrabaná... Spoznáte ma podľa mojich bodkovaných HAPPY SOCKS ponožiek!

     Taký je môj mladý študentský život... Všeobecne, môj momentálne stereotypný život. Plný neočakávaných balíčkov, ktoré posledný týždeň otváram a otváram... Tento rok som bola naozaj asi veľmi-preveľmi dobrá! Tiež som dostala ďalší úžasný balíček plný vecičiek na vyrábanie vianočných ozdôb, či balenia vianočných darčekov. Dnes tu mám pre vás ďalšie vianočné DIY, ktoré sa mi podarilo zrealizovať opäť v spolupráce s fenomenálnym veľkoobchodom STOKLASA, kde nájdete rôzne drobnôstky na kreáciu od výmyslu sveta! A poviem vám, niektoré vecičky majú za naozaj bezkonkurenčné ceny! Priznám sa, že jedna z týchto ozdôb bola vyrobená už minulý rok. Bol to jeden z mojich plánov v rámci minuloročného vianočného CHALLENGE, však už nebol čas pridať tutoriál... Tak som sa tento rok rozhodla, že to zopakujem v rámci tejto spolupráce, kde som dostala ďalšie dve PLASTOVÉ POLOGULE, ktoré v Liberci v galantérií nájdete o viac ako 100% drahšie ako v STOKLASE! Určite sa vám oplatí kúpiť si ten 12ks balíček a vyčariť doma atmosféru podľa vašich predstáv. Fantázií sa naozaj medze nekladú! Či ich naplníte malými korálkovými KRYŠTÁLIKMI, chlpatými BOMBUĽKAMI, či rôznými inými VIANOČNÝMI DEKORÁCIAMI... Je to len na vás! A keďže milujem bielu farbu, volila som práve tú aj v odtieni STUHY, či všetkých použitých doplnkov...

     To by bolo na dnes asi všetko... Nezabudnite na GIVEAWAY. A na ďalšiu vianočnú PIESEŇ... Naozaj veľa slov, však akurát toľko za dlhý čas, ktorý sme sa "nevideli". Verím, že sa máte dobre, pripravujete sa najkrajšie obdobie roku a dni trávite lepšie ako ja!


ENGLISH : Sh*it happens to everything... I am sorry for the language, but it is true. My life is just about my college, the bachelor work and also the semestral work and... I travel up and down to Prague, also from Liberec to Prešov, I can not stop anywhere and I even have not had a peaceful sleep about 3 weeks. I mostly do not have enough time for that and if I somehow find some, I wake up so early and I can not fall asleep again, because my mind gets full of thoughts. It starts to work as some robot and it wakes my whole consciousness up and it does not let my body to fully turn off... And so I have my head full of total stupid things! The Christmas ideas, the list of Christmas gifts, holidays preparations, shool and works I need to be done and also the Saturday's way back home... I am going to try the co-driving for the first time! If I will not write you till Christmas again, I was buried somewhere during the almost 700 km long way home... You will recognize my body by my dotted HAPPY SOCKS!

     So that is my students life... Generally, my whole stereotype life now. Full of unexpected packages, which I just open and open... I had to be pretty good and awesome this year! I also have got amazing package full of things for creating a handmade Christmas decoration and also for the gift wrapping. Today I have here for you another Christmas DIY, which I have prepared for you in the cooperation with phenomenal wholesale STOKLASA, where you can find a different trifles for creation you have ever dreamed to make! And I have to say you they have some things for unbeatable prices! I have to come clear that one of these Christmas balls was made last year. It was one of my planes for last year's Christmas CHALLENGE, but I have not had enought time to share it with you. So I decided this year that I will repeate it within the cooperation, where I have got another two PLASTIC HALF-BALLS, which I have found for than 100% more expencive prive as I have found it in STOKLASA! It is worth it to order that 12 pieces set package and create the home atmosphere as you imagine. Your fantasy has no limits! It does no matter if you put inside the beautiful small CRYSTAL BEADS, FLUFFY LITTLE BALLS, or some other CHRISTMAS CREATING DECORATIONS... It is just up to you! And because I love white color, I have chosen right that shade in the shade of the RIBBON, or in other used components...

     It would be all for today I think... Do not forget the GIVEAWAY. And another Christmas SONG... I had a lot of words today, all for that long time I have not "seen" you. I believe that you all feel good these days, that you are preparing yourself for the upcoming the most beautiful season of the year and you spend your days much better as I do!

       
PHOTOS BY : KEJMY.
  • 12 Comments
     Áno, opäť mám nový dizajn... Tentoraz plánujem zotrvať pri tomto čo najdlhšie, ak nie už natrvalo. Ale ako sa poznám, občas človek jednoducho potrebuje zmenu. Krok vpred, nasadiť vyššiu laťku, zmeniť svoj smer... Ale uznávam a viem, že to som vravela už pri predošlých, ale verím, že tentoraz sa mi to podarí ostať verná len jednému. Však dnes nie len o tom. Ranný budík v podobe hromobitia a bleskov nebeských paparazzov mi dal priestor na pustenie sa do kreácie vecí z môj DIY zoznamu. Tmavá obloha mi síce sťažila fotenie, však neodradila ma od pretvorenia krásne bielych hrnčekov. Jeden z nich ste mohli vidieť vo VIANOČNOM HRNČEKOVOM DIY v mojom challenge #30 DAYS OF CHRISTMAS. Fixky na pohári nakoniec nedržali, tak som odstránila posledné zbytky a použila ho opäť. Nesmierne rada "recyklujem" veci, opäť používam a dávam im novú podobu!

     Takže šup sa do roboty, je to ďalší tutoriál, ktorý zvládnu všetky ruky sveta. Stačí mať chuť, odhodlanie a poviem vám, čím viac chaoticky to spravíte, tým lepšie to vyzerá. A ak sa vám to nebude páčiť, môžte to odstrániť odlakovačom, však musí to byť ešte počas tvorby. Tiež, ak chcete, aby laky lepšie držali, prejdite tampónikom s odlakovačom na nechty povrch hrnčeka a následne utrite čistou utierkou. Výsledný efekt nechajte poriadne uschnúť. Máte krásny darček, či radosť v začínajúcich chladných upršaných jesenný dňoch!

     PIESEŇ ako stvorená na tento upršaný deň!


ENGLISH : Yep, I have a new design again... This time I want to stay with it as long as it will be possible, or forvever. But as I know myself, people just need change sometimes. Step forward, higher slat, change the direction... But I have to recognize and I know that I also have said the same things with former designs before, but I believe that this time I will be faithfull to this one. But today I do not want to talk just about it. The morning alarm clock of  squall and fleshes of heavenly paparazzi gave me the chance to create some things from my DIY list. The dark sky hinder my photoshooting, but it have not discourage me to remake this beautiful white mugs. You could see one of them in my CHRISTMAS DIY MUGS tutorial in my #30 DAYS OF CHRISTMAS challenge. The markers just did not withstand on the surface of the mugs, so I remove the rest of it and I used the mug again. I really like to "recycle" things, to use it again and give them a new look!

     So let's get to the work, it is another tutorial which all hands of the world can do. You just need the will to do it and I have to say that the more chaoticly you make it, the better it looks. And if you will not like it, you can remove the nail polishes with nail polish remover, but it has to be during your work. And if you want to the nail polishes to stick better, also clean up the mugs with the swab with nail polish remover on it and then just wipe it with some paper towel. Let the resultant efect dry well. You have wonderful present for someone, or just a pleasure in beginning cold and rainy autumn days!

     This SONG is perfect for the rainy day like this!


PHOTOS BY : KEJMY.
  • 23 Comments
Older Posts Home

ABOUT ME

Kejmy | 28 | Bratislava, Slovakia


"The most important thing is to enjoy your life — to be happy — it’s all that matters.”

FOLLOW MY JOURNY:

  • instagram
  • pinterest
  • facebook

LABELS

#30 DAYS OF CHRISTMAS beauty DIY DIY-ACCESSORIES DIY-FASHION DIY-INTERIOR DIY-JEWELRY DIY-OTHER fashion food giveaway how to become a designer KEJMY TATRANSKA DESIGN other outfit review SEW WITH KEJMY sewing traveling

BLOG ARCHIVE

  • ▼  2018 (34)
    • December (2)
    • November (3)
    • October (3)
    • September (5)
    • August (2)
    • July (1)
    • June (1)
    • May (2)
    • April (5)
    • March (2)
    • February (4)
    • January (4)
  • ►  2017 (38)
    • December (10)
    • November (5)
    • October (5)
    • September (5)
    • August (5)
    • July (8)
  • ►  2015 (68)
    • December (6)
    • November (8)
    • October (8)
    • September (7)
    • August (8)
    • July (5)
    • June (6)
    • May (3)
    • April (5)
    • March (4)
    • February (5)
    • January (3)
  • ►  2014 (123)
    • December (19)
    • November (12)
    • October (7)
    • September (8)
    • August (12)
    • July (12)
    • June (7)
    • May (4)
    • April (6)
    • March (10)
    • February (15)
    • January (11)
  • ►  2013 (183)
    • December (15)
    • November (8)
    • October (9)
    • September (13)
    • August (23)
    • July (18)
    • June (20)
    • May (15)
    • April (19)
    • March (18)
    • February (15)
    • January (10)
  • ►  2012 (197)
    • December (19)
    • November (15)
    • October (16)
    • September (19)
    • August (22)
    • July (20)
    • June (13)
    • May (15)
    • April (14)
    • March (15)
    • February (14)
    • January (15)
  • ►  2011 (89)
    • December (17)
    • November (13)
    • October (13)
    • September (16)
    • August (24)
    • July (6)

GOOGLE FRIENDS

instagram

© KEJMY TATRANSKA | 2022 | Template Created By : Blogger Templates | ThemeXpose.

Back to top